
 There are two major assemblies in the tank. The valve on the left lets the water into the tank, and is
usually called a ballcock, or a toilet fill valve. The thing in the center lets the water into the
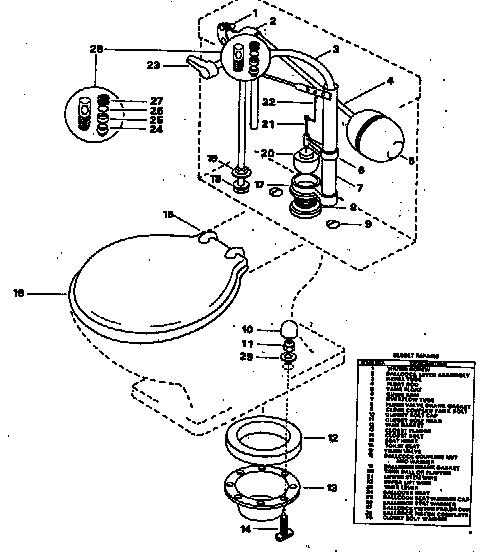
bowl when you flush, and is called a flush valve. The fill valve (ballcock) is usually one of two types.
The first type, pictured to the left is usually a brass or plastic assembly with a plastic or copper float ball
attached with a long rod (float rod)(4). The second type has a built in float, and is probably made by Fluidmaster, and is usually pink/orange or black and grey. The Flush valve is usually like the one pictured (Douglass Flush Valve),
and is usually made from brass or copper. Older styles most often have a rubber tank ball (20) attached to the lower lift wire. Newer styles
will usually have a flapper instead of the tank ball, lift wires and guide arm (6).
Some other toilets will have a piston like assembly instead of the tank ball/flapper. This type is found on Mansfield and some American Standard products. Some other
American Standard models use a hard plastic tilt valve instead of the flapper. The information below applies to all of these.
There are two major assemblies in the tank. The valve on the left lets the water into the tank, and is
usually called a ballcock, or a toilet fill valve. The thing in the center lets the water into the
bowl when you flush, and is called a flush valve. The fill valve (ballcock) is usually one of two types.
The first type, pictured to the left is usually a brass or plastic assembly with a plastic or copper float ball
attached with a long rod (float rod)(4). The second type has a built in float, and is probably made by Fluidmaster, and is usually pink/orange or black and grey. The Flush valve is usually like the one pictured (Douglass Flush Valve),
and is usually made from brass or copper. Older styles most often have a rubber tank ball (20) attached to the lower lift wire. Newer styles
will usually have a flapper instead of the tank ball, lift wires and guide arm (6).
Some other toilets will have a piston like assembly instead of the tank ball/flapper. This type is found on Mansfield and some American Standard products. Some other
American Standard models use a hard plastic tilt valve instead of the flapper. The information below applies to all of these.
Problem number two. The water never goes to the top of the overflow, or if you have a Fluidmaster type, it sounds like the toilet flushes itself every so many minutes. This is almost always caused by a faulty tank ball/flapper problem. If when you touch the rubber, your hands get black, then the rubber is deteriorated, and needs to be replaced. Most tank balls and flappers are standard and fit almost any toilet. The most notable exceptions are American Standard, Briggs, Mansfield, Kohler, Sears/Universal Rundle and Eljer. Bring your sample in for the correct replacement. We can fit almost every tank out there.
The actual repair is easy. For the flapper type, unhook the chain from the tank lever (23) and unhook the ears from the flush valve. Some flappers are slipped over the overflow tube. Just pull it off and replace. Hook the chain back up so that there is very little play in the chain. You want the flapper to come up as soon as the lank lever is flushed. For the tank ball type, hold the rubber ball and turn the lower lift wire (21) to unscrew. Replace the ball with a new one and replace the lift wires if they are not straight. You can usually replace all of this with a flapper, if you prefer. For Mansfield and American Standard piston types, remove the cap at the top (unscrew) and pull up on the piston. On older models, you will find a washer attached to the bottom of the piston. Carefully pull off and replace. The newer style Mansfield has the washer near the bottom of the tank. After the piston is out, pull off the rubber, which fits inside the groove near the bottom. This is a thin FLAT washer. American standard Tilt Valves use a snap on or screw on seat disk Unscrew the disk, or carefully pull off the snap on type and replace.
Problem number three. You have water on the floor. There are two possibilities for this. First, check around the tank to see if the water is dripping down from there. If so, you need to remove the tank. First, turn off the water and flush the toilet. Remove the rest of the water from the tank with a sponge. Unhook the water supply line from the bottom of the fill valve. Next, look under the back of the bowl, where the tank is attached. You will find 2, 3 or 4 nuts, or wingnuts. Remove these. If the entire Close Couple Bolt (9) assembly turns, you will need someone to hold a long screwdriver in the tank to keep the bolt from turning. At the very least, you should replace the bolt washers and the Close Couple Gasket, which looks like a big black donut in the center, between the tank and bowl. I don't care what the guy at Home Depot told you; there are different close couple gaskets for different toilets. "One size fits 'em all" just doesn't make it, especially if you have a Kohler, Eljer, Mansfield, American Standard, or Gerber toilet. We have the correct one. I would also recommend replacing the entire close couple bolt assemblies, not just the rubbers. Check the inside of the tank for the condition of the gasket that seals the flush valve to the inside of the tank. It can be replaced by unscrewing the big nut under the center of the tank. When reinstalling the close couple bolts, be carefull of how you tighten. Too loose and they leak, Too tight and you crack the tank. Go hand tight, and then a few turns of the wrench on each bolt. Hook the water supply back up and turn it on. If you get leaks at this point, tighten the bolts a bit until it stops. Go back and forth from bolt to bolt. DO NOT TIGHTEN one all the way and then the other. The tank WILL crack. This should do it for you.
If there was no leak from the tank, your wax seal (12) under the bowl needs replacing. The safest way to do this is to remove the tank first, although it can be done with the tank on. Modern style toilets have 2 closet bolts (14) that hold the bowl to the closet flange (13). Remove the nuts from these bolts. If you have a 4 bolt type, also remove the 2 front screws. Making sure the tank is either off, or the water supply is disconnected, pull the toilet straight up. Set it down on some newspaper or cloth. Clean off the closet flange and inspect for damage. If the bolt slots are broken, we have an easy solution for you. Come on in. If the flange has sunk below the flooring, you will need a flange extension or a double seal. No big deal. If the flange is above the floor, you will either need to shorten the pipe (difficult) or cut out a piece of plywood in the shape of the bowl to build it up. If it's minor, you can put some plaster of paris down and set the bowl in that to build it up. Place your new wax seal around the hole on the bottom of the bowl, and carefully lower over the bolts. New bolts are a good idea. {TIP} Use an extra nut to hold the bolts firmly to the closet flange. Sit on the bowl to compress the wax and then put the nuts back on the bolts. Sit again and retighten. Do not over do it. Follow the same instructions in tightening these bolts as you did for the close couple bolts. The bowl should not rock or move. If it does, try some wedges, or the plaster of Paris tip above. That should do ya. Your Throne is ready. (G)