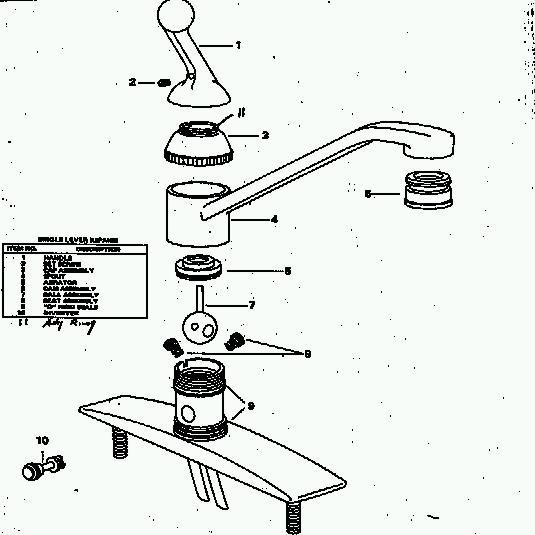
The image to the left shows all of the parts used in the most popular single handle faucets. Although the model pictured is for a kitchen, the bathroom sink and showers are repaired in much the same way. This type of faucet is available from many companies. The one shown at the left is Delta/Peerless, and has been widely copied by many "Store Brand" faucet companies. The identifying characteristic of this faucet type is the round control ball (7) inside. Other types may take a cartridge, which may, or may not be rebuildable. These instructions do not pertain to products made by Moen/Stanadyne, Sterling/Rockwell, Kohler, American Standard, and newer Valley/Sears models, which are cartridge types. See instructions below for these types.
Leaks
A leaky faucet is usually easy for the do-it-yourselfer to repair. In most cases, no special tools are required. In some situations, a pipe wrench* may be needed. Good suppliers rent these for a very low price, and show you how to use them. Below is a list of tools you may need. Items marked with a "*" usually may be rented.
Replace the Seat and Spring assemblies. The seats must be of the correct type for your faucet. For Delta/Peerless, they come in several styles. If you have the old brass ball, use long seats and springs. For the plastic, or newer Stainless Steel balls use the short set.
Now, lets look at the ball. This ball works in conjunction with the springs and seats. If the ball is nicked or scratched, it will wear out your new seats very quickly. Replace the ball if needed. Any type will do as long as you use the correct seats. (NOTE: There are a few newer models that require specific balls.) Replace the ball and replace the cam assembly. Re-install the Cap assembly and turn the water back on. Check for leaks. If you get water around the shaft of the ball, you will need to screw down the adjusting ring (11).
If you were leaking around the spout (4), the rubber spout "O" rings need to be replaced. Follow the dis-assembly instructions above, and also pull off the spout by lifting as you wiggle it back and forth. If your faucet has a spray hose off to the side, the control for this, the spray diverter (10), is located under the spout, as well. If the water comes out of both the spout and sprayer, the spray diverter is usually the bad boy that needs replacing.
If everything is OK, replace the handle and you're done.
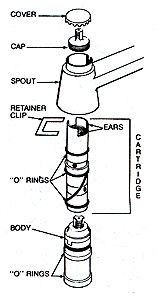 This type of faucet is a bit more difficult to service, but can usually still be done by the average Do-It-Yourselfer.
First, remove the handle. The handle type varies from model to model. Most have a chrome or plastic cap on top.
Remove the cap, and then the screw. On most models that use a metal lever handle, the next part you will come
to is a brass or chrome Pivot Nut. Screw this off. This step usually will not apply if you have a clear plastic handle. Looking down at the cartridge, you will see two
clips. The larger horseshoe retainer clip (see diagram at left) needs to be slipped off. DO NOT REMOVE the smaller retainer clip around the center of the cartridge.
Using the white plastic tool that comes with the new cartridge, rotate the cartridge back and forth, then, with a pliers, pull the cartridge straight out.
If it won't move, wiggle as you pull. If it still won't come, we can rent you a Moen Cartridge puller* to do this.
This type of faucet is a bit more difficult to service, but can usually still be done by the average Do-It-Yourselfer.
First, remove the handle. The handle type varies from model to model. Most have a chrome or plastic cap on top.
Remove the cap, and then the screw. On most models that use a metal lever handle, the next part you will come
to is a brass or chrome Pivot Nut. Screw this off. This step usually will not apply if you have a clear plastic handle. Looking down at the cartridge, you will see two
clips. The larger horseshoe retainer clip (see diagram at left) needs to be slipped off. DO NOT REMOVE the smaller retainer clip around the center of the cartridge.
Using the white plastic tool that comes with the new cartridge, rotate the cartridge back and forth, then, with a pliers, pull the cartridge straight out.
If it won't move, wiggle as you pull. If it still won't come, we can rent you a Moen Cartridge puller* to do this.Insert new cartridge, and replace all of the other parts. Usually, both Brass (1200) and Plastic (1225) cartridges are interchangeable, and some generics may look very different than the one you remove. If you had water leaking around the spout, the Spout Seals ("o" rings) need to be replaced. See the instructions above for Delta.
If you still have problems, please make a donation (see below) and drop me an email, or IM to RPSREEDMAN