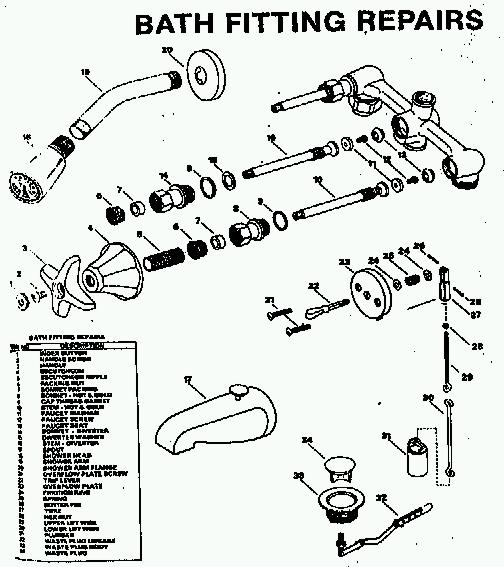
 The image to the left shows all of the parts used in the common 3 valve diverters used in the phila. area.
This type of faucet is available in both 8" and 11" centers. Almost all newer bathrooms use the 8" model.
To check your size, measure between the center of the hot, to the center of the cold handle.
The image to the left shows all of the parts used in the common 3 valve diverters used in the phila. area.
This type of faucet is available in both 8" and 11" centers. Almost all newer bathrooms use the 8" model.
To check your size, measure between the center of the hot, to the center of the cold handle.
Leaks A leaky faucet is usually easy for the do-it-yourselfer to repair. In most cases, no special tools are required. In some situations, a special socket wrench and/or a seat tool may be needed. Quality stores will rent these for a very low price, and show you how to use them. Below is a list of tools you may need. Items marked with a "*" may be rented or purchased.
The next step is to remove the escutcheons. (4) The cone type almost always screws off. If your escutcheon looks like a tube with a separate ring around it at back, look for a hole on the edge and loosen the screw inside the hole and pull off. You can now unscrew the tube with your adjustable wrench. To keep the tubes from being scratched, wrap in electrical tape first. Almost all faucet valves have a packing nut(6) in them. You will usually see what looks like a smaller nut inside of a large nut. It's best to leave this nut in while doing the next step. If you have a cone escutcheon, the packing nut may come off with it. Try and remove it and replace in the stem bonnet. (8 & 14)
Using a Pipe or Adjustable wrench, screw out the bonnet. DO NOT use a Vice grip. It will probably crush the bonnet, which is made from soft brass. In most cases, the stem will come out with the bonnet. If not, just screw it out. If the bigger nut is behind the wall, you should use a Shower Bonnet Socket * to remove it. You should replace ALL washers and gaskets while you have things apart. Replace the bib washers (11) and bib screws (12) on the back of the stem. If the washer is torn, loose, or missing, you should also replace the seat (13) which is in the very back of the hole that you took the stem from. There are a few faucets that do not use seats. If you are unsure, bring the stem and bonnet in to your store and they will look it up for you, and give you the correct seat. If you go to your local hardware store, and the clerk pills out a small box with about 20 sizes, and he tries to match it by thread size, you will probably wind up with the wrong seat. It may fit, but your stems may begin to wear, and you will soon need to replace them. Good suppliers will carry over 200 different seats, and can fit almost every faucet out there. Remember, you probably wouldn't put a Ford part in your Chevy!
Replace the cap thread gasket (9) on the back of the bonnet. If you had a lot of trouble removing the bonnet, the cap gasket was probably missing.
Replace the packing (7) in the front of the bonnet. Be sure to remove the old one first. It's probably inside the bonnet and can be removed by plucking
it out with a small screwdriver. It's best to use the correct, pre-formed packing for your stem. Self
forming string packing should only be used if you cannot get the correct packing washer. In all cases,
the packing should be installed over the stem, after it has been inserted back into the bonnet. Screw the packing nut in HAND tight. If your stem
has no packing, you will probably find one or more "O" Rings that should be replaced.
It's also a good idea to coat the threaded area of the stem with plumbers non-toxic waterproof grease. This will make the faucet
easier to operate and reduce wear. Also note, on 3 valve models, your center control will be different than the hot and cold and will
usually need some other special washers. (Diverter washers, etc.)
Now, let's put it back together. With the stem in the bonnet, in the full open position (screwed as far up to the back of the bonnet as possible), screw the assembly back into the valve body. Using your adjustable wrench, tighten it up, but don't over do it. DO NOT REPLACE ANY TRIM YET. Push a handle on and turn the valve so the water will be off on both hot and cold.Turn on the water supply. Slowly turn on the valve that you repaired. You will probably see water leaking around the packing nut. With your wrench, turn it just enough so it stops leaking. Check for leaks around the bonnet, and snug up as needed. If all is well, replace the trim, and enjoy the rest of the day. If you still have problems, make a donation (see below) and send me an email!