Two Handle Faucet Repair
This is another easy project for the Do-It-Yourselfer.
Tools Needed
- Screwdriver -Phillips & Slotted
- Adjustable Wrench *
- Handle Puller *
- Seat Removal Tool *
- Seat Dresser
Items marked with a * can be rented at very low cost at many good stores.
 These instructions apply to almost all two handle faucets used in kitchens, bathroom,
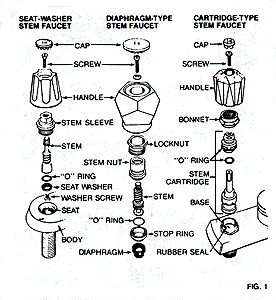
laundry room, and bar sinks. There are three major type of these faucets; seat-washer-stem, diaphragm, and washerless cartridge types. The seat-washer-stem is the most common and can usually be identified by turning the handle. If it turns more than completely around, then you probably have this type, which is usually the least expensive to repair. The other types generally only turn about one quarter of the way.
These instructions apply to almost all two handle faucets used in kitchens, bathroom,
laundry room, and bar sinks. There are three major type of these faucets; seat-washer-stem, diaphragm, and washerless cartridge types. The seat-washer-stem is the most common and can usually be identified by turning the handle. If it turns more than completely around, then you probably have this type, which is usually the least expensive to repair. The other types generally only turn about one quarter of the way.
Getting Started
The first step is to turn off the water to the faucet. There are usually shutoff valves under the sink. If not, you may need to shut of the valve at your water meter. The next step is to remove the handle. Most handles are held on by a screw through the top. Sometimes, it may be covered by a plastic or metal index button or cap. Some replacement handles may be held on by a set screw, usually on the side. Next, pull the handle straight off. If it's stuck, you should use a handle puller, which will prevent damage to the valve stem, Cartridge, and handle. This can be rented at or purchased at many stores. If you choose not to use the puller, gently pry or tap up on the handle to loosen. It's usually just hardened soap holding it on. Now, depending on what type of faucet you have, unscrew the locknut, bonnet or stem sleeve. After this part is removed, if you have the cartridge or diaphragm type, the part can simply be pulled out. On the seat-stem type, it may have come out with the stem sleeve. If not, it should screw out. You may have to turn it to the left or right, depending on the handle style and whether it's hot or cold.
Now Let's Fix it!
SEAT-WASHER STEM Type
I always recommend changing ALL of the soft parts while you have things apart. These washers, gaskets and "o" rings are cheap, and the brass stems last for years and years if you don't have to keep removing them, so it pays to fix it right. The brass stem needs to be replaced if the top where the handle attaches (broach) is broken or stripped, or if the stem just turns and never gets tight.
To re-washer the stem, remove the bib screw and pull the washer off. If the screw breaks, you will need to drill it out and re-tap the hole. We can do this for you if needed. Replace the seat washer with the correct size. You can usually read the size from the bottom of the old washer. NOTE: Almost every manafacturer supplies their stems with flat washers. Use of a beveled washer may cause the stem to wear out prematurely. Check the old washer for tears and nicks. If it's badly worn, you should replace the bib seat. Look down at the seat (you may need to remove the water with a paper towel) and inspect for nicks or cracks. If there are any at all, you should replace it. You will see on the inside of the seat a 4 or 5 sided hole. Using the correct seat wrench, unscrew the seat and replace with the correct new one. Very few faucets do not have removable seats. If the hole is round, it may not be replaceable and you will need a seat dresser to repair it. Bring in your stem to the store so they can check to see if your seat is not removable. If your local store has a box of seats with about 20 different sizes, it's time to leave. While a seat with the correct thread size will appear to work, you may soon need to replace the stem. Remember, your faucet was designed to use specific parts that work together. Using an incorrect seat has changed the way that the stem works and can lead to premature wear. Good suppliers carry over 200 different seats and can fit almost every faucet out there. Please bring your stem with you so they can look up the correct part.
While the stem is out, replace all packings, gaskets and "o" rings. Quality suppliers will stock the correct packings, gaskets and rings for your faucet. Bring your stem in so they can look up the correct parts for you. Again, remember, it's important to use the correct parts. Replace the stem and stem sleeve. Do not overtighten. Turn on the water and check for leaks.
Diaphragm Type
Repairs for this type are the same as above except there is no screw on the bottom. Just pull off the diaphragm and replace. Be sure to also replace the "o" rings on the stem.
Cartridge Types
This is known as a washerless faucet, but as you will soon see, most do use a type of washer. The most common type is made by Delta/Peerless, Valley, and some imported clones. Following the above instructions, remove the cartridge and inspect the bottom for nicks or scratches. If nicked, it needs to be replaced. If not, look down into the hole that you took the cartridge from and at the bottom, you will see a black rubber piece. Pluck out this rubber seal and remove the spring below it also. Replace with the correct type. They all look about the same, so be sure to bring in the cartridge to get the correct match. Most other types of cartridges can not be rebuilt and must be replaced.
If you find this information helpful, please consider making a donation.
 Back to the Main Page|
 Go to Top of Page|Go to Diagram